검색결과 리스트
PDF에 해당되는 글 5건
- 2025.06.02 PDF에 비밀번호 설정하기2
- 2025.05.28 PDF에 비밀번호 설정하기
- 2024.11.06 PDF 나누기(split) 2
- 2024.11.01 PDF 파일 합치기(수정) 1
- 2008.10.16 PDF 파일변환 유틸리티 PDFine v1.2.1 2
글
PDF에 비밀번호 설정하기2
2025.05.28 - [[楞嚴] 생각 나누기/[情] 사회복지정보화] - PDF에 비밀번호 설정하기
PDF에 비밀번호 설정하기
급한 분을 위해 파일을 먼저 올려두었습니다.하지만 아래도 한번 읽어봐주세요. 개인정보보호법 등이 강화되면서 PDF 파일을 보내려할 때에도 비밀번호를 설정해야하는 경우가 있습니다.하지만
welfareact.net
앞서 CMD 창에서 직접 입력해야하는 PDF 비밀번호 설정 프로그램을 공유했지만, 아무래도 이런 직접적인 명령에 익숙치 않은 분들도 많을거 같아 추가로 작업해보았습니다.
먼저번 것은 파일 하나만으로 가능토록 통합한 것이었다면, 이번엔 PDF 파일을 선택하고, 비밀번호를 입력하는 창이 떠서 보다 직관적으로 작업할 수 있도록 수정했습니다.
다만, 이번엔 파일 하나로 안되어서 압축 자동실행 파일로 만들었습니다.
위 파일을 다운로드 받으신 다음, 실행하면 프로그램 폴더가 만들어집니다.
이후 파일 중 bat 파일 [ PDF_비밀번호_v2.bat ]을 더블클릭하시면 됩니다.

아래는 몰라도 되는 이야기입니다.
위와 같이 만들기 위해 PowerShell GUI 스크립트를 먼저 만들었습니다.
바로 [ EncryptPdf-GUI.ps1 ] 파일입니다.
| Add-Type -AssemblyName Systehttp://m.Windows.Forms Add-Type -AssemblyName System.Drawing # 폼 생성 $form = New-Object Systehttp://m.Windows.Forms.Form $form.Text = "PDF 비밀번호 설정 도구 (use QPDF)" $form.Size = New-Object Systehttp://m.Drawing.Size(400, 360) $form.StartPosition = "CenterScreen" # 파일 선택 라벨 $fileLabel = New-Object Systehttp://m.Windows.Forms.Label $fileLabel.Text = "PDF 파일: 아직 선택되지 않음" $fileLabel.Location = New-Object Systehttp://m.Drawing.Point(10, 20) $fileLabel.Size = New-Object Systehttp://m.Drawing.Size(360, 20) $forhttp://m.Controls.Add($fileLabel) # 파일 선택 버튼 $fileButton = New-Object Systehttp://m.Windows.Forms.Button $fileButton.Text = "PDF 파일 선택" $fileButton.Location = New-Object Systehttp://m.Drawing.Point(10, 50) $fileButton.Size = New-Object Systehttp://m.Drawing.Size(120, 30) $forhttp://m.Controls.Add($fileButton) # 비밀번호 입력 라벨 $pwdLabel = New-Object Systehttp://m.Windows.Forms.Label $pwdLabel.Text = "설정할 비밀번호:" $pwdLabel.Location = New-Object Systehttp://m.Drawing.Point(10, 100) $pwdLabel.Size = New-Object Systehttp://m.Drawing.Size(200, 20) $forhttp://m.Controls.Add($pwdLabel) # 비밀번호 입력 박스 $pwdBox = New-Object Systehttp://m.Windows.Forms.TextBox $pwdBox.Location = New-Object Systehttp://m.Drawing.Point(10, 125) $pwdBox.Size = New-Object Systehttp://m.Drawing.Size(360, 25) $pwdBox.UseSystemPasswordChar = $true $forhttp://m.Controls.Add($pwdBox) # 암호화 버튼 $encryptButton = New-Object Systehttp://m.Windows.Forms.Button $encryptButton.Text = "PDF 암호화 실행" $encryptButton.Location = New-Object Systehttp://m.Drawing.Point(10, 160) $encryptButton.Size = New-Object Systehttp://m.Drawing.Size(120, 30) $forhttp://m.Controls.Add($encryptButton) # 상태 표시 라벨 $statusLabel = New-Object Systehttp://m.Windows.Forms.Label $statusLabel.Text = "" $statusLabel.Location = New-Object Systehttp://m.Drawing.Point(10, 200) $statusLabel.Size = New-Object Systehttp://m.Drawing.Size(360, 40) $forhttp://m.Controls.Add($statusLabel) # 저작권 라벨 $copyrightLabel = New-Object Systehttp://m.Windows.Forms.Label $copyrightLabel.Text = "This software includes QPDF, licensed under Apache License 2.0.`nSee https://github.com/qpdf/qpdf" $copyrightLabel.Location = New-Object Systehttp://m.Drawing.Point(10, 250) $copyrightLabel.Size = New-Object Systehttp://m.Drawing.Size(380, 50) $copyrightLabel.Font = New-Object Systehttp://m.Drawing.Font("Arial", 8) $forhttp://m.Controls.Add($copyrightLabel) # 전역 변수로 파일 경로 보관 $global:selectedPdfPath = $null # 파일 선택 버튼 이벤트 $fileButton.Add_Click({ $fileDialog = New-Object Systehttp://m.Windows.Forms.OpenFileDialog $fileDialog.Filter = "PDF Files (*.pdf)|*.pdf" if ($fileDialog.ShowDialog() -eq "OK") { $global:selectedPdfPath = $fileDialog.FileName $fileLabel.Text = "PDF 파일: " + [Systehttp://m.IO.Path]::GetFileName($selectedPdfPath) } }) # 암호화 버튼 이벤트 $encryptButton.Add_Click({ if (-not $selectedPdfPath) { [Systehttp://m.Windows.Forms.MessageBox]::Show("먼저 PDF 파일을 선택하세요.", "오류", "OK", "Error") return } $password = $pwdBox.Text if (-not $password) { [Systehttp://m.Windows.Forms.MessageBox]::Show("비밀번호를 입력하세요.", "오류", "OK", "Error") return } $outputPath = Join-Path -Path ([Systehttp://m.IO.Path]::GetDirectoryName($selectedPdfPath)) -ChildPath ("encrypted_" + [Systehttp://m.IO.Path]::GetFileName($selectedPdfPath)) try { Start-Process -FilePath "qpdf.exe" -ArgumentList "--encrypt `"$password`" `"$password`" 256 -- `"$selectedPdfPath`" `"$outputPath`"" -NoNewWindow -Wait $statusLabel.Text = "★ 암호화 완료! 파일: encrypted_" + [Systehttp://m.IO.Path]::GetFileName($selectedPdfPath) } catch { $statusLabel.Text = "☆ 암호화 실패: $_" } }) # 폼 실행 $form.Topmost = $true $form.Add_Shown({ $form.Activate() }) [void]$form.ShowDialog() |
이후 이 파일을 .bat에서 불러오게 했습니다.
| @echo off title PDF 비밀번호 설정 도구 실행기 (QPDF) echo ======================================== echo PowerShell GUI를 실행합니다... echo ======================================== echo. powershell -ExecutionPolicy Bypass -File "%~dp0EncryptPdf-GUI.ps1" echo. |
'[정보] IT정보&활용' 카테고리의 다른 글
| [한컴한글] 제목 셀을 세로로... (0) | 2025.04.23 |
|---|---|
| 구글 스프레드 시트에서 날짜와 시간을 계산하는 방법 (0) | 2025.01.10 |
| 엑셀로 IPA 분석하기, VBA 활용 (1) | 2024.11.29 |
| PDF 나누기(split) (2) | 2024.11.06 |
| PDF 파일 합치기(수정) (1) | 2024.11.01 |
설정
트랙백
댓글
글
PDF에 비밀번호 설정하기
급한 분을 위해 파일을 먼저 올려두었습니다.
하지만 아래도 한번 읽어봐주세요.
개인정보보호법 등이 강화되면서 PDF 파일을 보내려할 때에도 비밀번호를 설정해야하는 경우가 있습니다.
하지만 유료 프로그램을 사용해야하는 등 쉽지가 않습니다.
특정 웹사이트를 이용하면 비밀번호를 걸어주기도 하지만, 그 경우 서버로 파일을 일단 업로드 해야하기 때문에 해당 파일이 유출되지 않을 것이라는 보장은 없습니다.
그래서 찾아보았습니다.
Github에 보면 qpdf라는 프로그램이 있습니다.
GitHub - qpdf/qpdf: qpdf: A content-preserving PDF document transformer
qpdf: A content-preserving PDF document transformer - qpdf/qpdf
github.com
다양한 기능을 가진 프로그램이지만, 사용법이 쉬워보이진 않습니다.
그래도 설명해보자면, 파일들을 다운받은 다음 bin 폴더에 있는 qpdf.exe 파일을 cmd 창에서 실행합니다.
| qpdf.exe --encrypt %userPwd% %userPwd% 256 -- "%inputFile%" "encrypted_%inputFile%" |
이걸 bat 파일로 만들면 조금더 쉽긴 합니다.
PDF_Encryptor.bat
| @echo off title PDF 암호화 도구 (QPDF) echo ============================== echo PDF 파일에 비밀번호를 설정합니다. echo set a password on your PDF echo ============================== echo. set /p inputFile="비밀번호를 설정할 PDF 파일명을 입력하세요 (예: sample.pdf): " set /p userPwd="설정할 비밀번호를 입력하세요: " :: 암호화 실행 - 소유자 비밀번호는 사용자 비밀번호와 동일하게 설정 qpdf.exe --encrypt %userPwd% %userPwd% 256 -- "%inputFile%" "encrypted_%inputFile%" echo. echo ■ 암호화 완료! 결과 파일: encrypted_%inputFile% echo ----------------------------------------------------------------------------------------- echo This software includes QPDF, which is licensed under the Apache License 2.0. echo See https://github.com/qpdf/qpdf for more information. pause |
조금더 검색해 봅니다.
그랬더니 bat 파일을 기반으로 exe, dll 등을 묶어서 하나의 실행파일로 만들어주는 프로그램을 Github에서 찾을 수 있습니다.
https://github.com/l-urk/Bat-To-Exe-Converter-64-Bit/releases
Releases · l-urk/Bat-To-Exe-Converter-64-Bit
Bat To Exe Converter (64 Bit) - Developer Fatih Kodak - l-urk/Bat-To-Exe-Converter-64-Bit
github.com
이제 이걸 이용해서 하나의 파일로 묶어봅니다.
예의상 README.txt도 만들어 봅니다.
이제 PDF_Encryptor.exe 파일 하나만 있으면 PDF에 비밀번호를 설정할 수 있습니다.
단, 이 실행파일과 PDF 파일이 같은 폴더에 있어야 합니다.
그리고 PDF 파일 명은 직접 입력해주셔야 합니다.
기왕 만들었으니 배포해봅니다. 저작권에도 문제는 없다고 합니다.
그럼...
'[楞嚴] 생각 나누기 > [情] 사회복지정보화' 카테고리의 다른 글
| 생태도 그리기 웹앱 v1.1 (1) | 2025.06.17 |
|---|---|
| 가계도 그리기 웹앱 v1.1 (1) | 2025.06.12 |
| 구글 Apps Script로 후원신청서 만들기 (3) | 2024.09.30 |
| Apps Script를 활용해 스프레드 시트로 데이터 전송하기 (0) | 2024.09.23 |
| 폰트 저작권 이슈에 대한 점검 (0) | 2020.08.12 |
설정
트랙백
댓글
글
PDF 나누기(split)
PDF를 두개로 나누는 html입니다.
pdf-lib (MIT 라이선스): https://github.com/Hopding/pdf-lib
pdf.js (Apache 2.0 라이선스): https://github.com/mozilla/pdf.js
위 라이브러리를 사용하였으며, chatGPT 등의 도움을 받아 실습 삼아 만들어 보았습니다.
아래는 html 스크립트 입니다.
<!DOCTYPE html>
<html lang="ko">
<head>
<meta charset="UTF-8">
<title>PDF 나누기 (Split)</title>
<!-- pdf-lib 및 pdf.js 라이브러리 로드 -->
<script src="https://cdnjs.cloudflare.com/ajax/libs/pdf-lib/1.17.1/pdf-lib.min.js"></script>
<script src="https://cdnjs.cloudflare.com/ajax/libs/pdf.js/2.10.377/pdf.min.js"></script>
<style>
body {
font-family: Arial, sans-serif;
display: flex;
justify-content: center;
align-items: center;
min-height: 100vh;
background-color: #f3f4f6;
margin: 0;
}
.container {
width: 100%;
max-width: 500px;
padding: 20px;
background: white;
border-radius: 8px;
box-shadow: 0 4px 8px rgba(0, 0, 0, 0.2);
}
h1 {
font-size: 24px;
color: #333;
text-align: center;
}
p {
font-size: 14px;
color: #555;
text-align: left;
}
input[type="file"] {
width: 100%;
padding: 10px;
margin: 10px 0;
font-size: 14px;
}
input[type="number"] {
width: 50%;
padding: 10px;
margin: 10px 0;
font-size: 14px;
}
#split-button {
width: 100%;
padding: 12px;
background-color: #28a745;
color: white;
border: none;
border-radius: 5px;
font-size: 16px;
cursor: pointer;
margin-top: 10px;
}
#split-button:hover {
background-color: #218838;
}
footer {
text-align: left;
font-size: 12px;
color: #777;
margin-top: 20px;
}
</style>
</head>
<body>
<div class="container">
<h1>PDF 나누기</h1>
<p>PDF를 두 개의 파일로 나눌 수 있습니다.</p>
<p>1. "파일 선택" 버튼을 눌러 나눌 PDF 파일을 선택하세요.</p>
<input type="file" id="file-input" accept="application/pdf" />
<p>2. 나눌 페이지 번호를 입력하세요. <br>
(예: 3을 입력하면 1-3페이지와 4-마지막 페이지로 나뉩니다.)</p>
<input type="number" id="split-page" min="1" />
<p>3. "PDF 나누기" 버튼을 누르세요.</p>
<button id="split-button">PDF 나누기</button>
<footer>
<p><strong>사용된 라이브러리</strong></p>
<ul>
<li>pdf-lib (MIT 라이선스): <a href="https://github.com/Hopding/pdf-lib">https://github.com/Hopding/pdf-lib</a></li>
<li>pdf.js (Apache 2.0 라이선스): <a href="https://github.com/mozilla/pdf.js">https://github.com/mozilla/pdf.js</a></li>
</ul>
</footer>
</div>
<script>
const fileInput = document.getElementById('file-input');
const splitPage = document.getElementById('split-page');
const splitButton = document.getElementById('split-button');
splitButton.addEventListener('click', async () => {
if (!fileInput.files[0]) {
alert('PDF 파일을 선택해주세요.');
return;
}
const pageNumber = parseInt(splitPage.value);
if (isNaN(pageNumber) || pageNumber < 1) {
alert('유효한 페이지 번호를 입력해주세요.');
return;
}
const file = fileInput.files[0];
const arrayBuffer = await file.arrayBuffer();
const pdfDoc = await PDFLib.PDFDocument.load(arrayBuffer);
if (pageNumber >= pdfDoc.getPageCount()) {
alert('입력한 페이지 번호가 PDF의 총 페이지 수보다 크거나 같습니다.');
return;
}
// 첫 번째 PDF 생성 (1부터 pageNumber까지)
const firstPdf = await PDFLib.PDFDocument.create();
const firstPages = await firstPdf.copyPages(pdfDoc, Array.from({length: pageNumber}, (_, i) => i));
firstPages.forEach(page => firstPdf.addPage(page));
// 두 번째 PDF 생성 (pageNumber+1부터 끝까지)
const secondPdf = await PDFLib.PDFDocument.create();
const secondPages = await secondPdf.copyPages(pdfDoc, Array.from({length: pdfDoc.getPageCount() - pageNumber}, (_, i) => i + pageNumber));
secondPages.forEach(page => secondPdf.addPage(page));
// PDF 저장 및 다운로드
const firstPdfBytes = await firstPdf.save();
const secondPdfBytes = await secondPdf.save();
downloadPdf(firstPdfBytes, 'split_first.pdf');
downloadPdf(secondPdfBytes, 'split_second.pdf');
});
function downloadPdf(pdfBytes, fileName) {
const blob = new Blob([pdfBytes], { type: 'application/pdf' });
const url = URL.createObjectURL(blob);
const a = document.createElement('a');
a.href = url;
a.download = fileName;
a.click();
URL.revokeObjectURL(url);
}
</script>
</body>
</html>
'[정보] IT정보&활용' 카테고리의 다른 글
| 구글 스프레드 시트에서 날짜와 시간을 계산하는 방법 (0) | 2025.01.10 |
|---|---|
| 엑셀로 IPA 분석하기, VBA 활용 (1) | 2024.11.29 |
| PDF 파일 합치기(수정) (1) | 2024.11.01 |
| [구글 Apps Script] PDF로 출력하기 (0) | 2024.10.23 |
| [구글 스프레드 시트] 서명받기 (0) | 2024.08.27 |
설정
트랙백
댓글
글
PDF 파일 합치기(수정)
위 파일을 자신의 컴퓨터로 다운 받아서 그냥 실행하시면 됩니다.
pdf-lib (MIT 라이선스): https://github.com/Hopding/pdf-lib
pdf.js (Apache 2.0 라이선스): https://github.com/mozilla/pdf.js
위 두 개의 라이브러리를 사용하였으며, chatGPT 등의 도움을 받아 실습 삼아 만들어 보았습니다.
아래는 html 스크립트입니다.
---------------------------------------------
<!DOCTYPE html>
<html lang="ko">
<head>
<meta charset="UTF-8">
<title>PDF 합치기 (Merge)</title>
<!-- pdf-lib 및 pdf.js 라이브러리 로드 -->
<script src="https://cdnjs.cloudflare.com/ajax/libs/pdf-lib/1.17.1/pdf-lib.min.js"></script>
<script src="https://cdnjs.cloudflare.com/ajax/libs/pdf.js/2.10.377/pdf.min.js"></script>
<!-- 스타일링 -->
<style>
body {
font-family: Arial, sans-serif;
display: flex;
justify-content: center;
align-items: center;
min-height: 100vh;
background-color: #f3f4f6;
margin: 0;
}
.container {
width: 100%;
max-width: 500px;
padding: 20px;
background: white;
border-radius: 8px;
box-shadow: 0 4px 8px rgba(0, 0, 0, 0.2);
}
h1 {
font-size: 24px;
color: #333;
text-align: center;
}
p {
font-size: 14px;
color: #555;
text-align: left;
}
input[type="file"] {
width: 100%;
padding: 10px;
margin: 10px 0;
font-size: 14px;
}
#file-list {
list-style: none;
padding: 0;
margin: 10px 0;
}
#file-list li {
padding: 10px;
border: 1px solid #ddd;
border-radius: 5px;
margin: 5px 0;
display: flex;
justify-content: space-between;
align-items: center;
background-color: #f9f9f9;
}
.move-buttons button {
padding: 5px;
margin: 0 2px;
background: #4a90e2;
color: white;
border: none;
border-radius: 3px;
cursor: pointer;
font-size: 12px;
}
.move-buttons button:hover {
background: #357ABD;
}
#merge-button {
width: 100%;
padding: 12px;
background-color: #28a745;
color: white;
border: none;
border-radius: 5px;
font-size: 16px;
cursor: pointer;
margin-top: 10px;
}
#merge-button:hover {
background-color: #218838;
}
footer {
text-align: left;
font-size: 12px;
color: #777;
margin-top: 20px;
}
</style>
</head>
<body>
<div class="container">
<h1>PDF 합치기</h1>
<p>여러 개의 PDF를 하나로 합칠 수 있습니다.</p>
<p>1. "파일 선택" 버튼을 눌러 합칠 파일을 선택하세요.</p>
<input type="file" id="file-input" multiple accept="application/pdf" />
<p>2. 아래 목록에서 ↑↓를 눌러 순서를 조정하세요.</p>
<ul id="file-list"></ul>
<p>3. 순서를 확인한 후 "PDF 합치기" 버튼을 누르세요.</p>
<button id="merge-button">PDF 합치기</button>
<footer>
<p><strong>사용된 라이브러리</strong></p>
<ul>
<li>pdf-lib (MIT 라이선스): <a href="https://github.com/Hopding/pdf-lib">https://github.com/Hopding/pdf-lib</a></li>
<li>pdf.js (Apache 2.0 라이선스): <a href="https://github.com/mozilla/pdf.js">https://github.com/mozilla/pdf.js</a></li>
</ul>
</footer>
</div>
<script>
const fileInput = document.getElementById('file-input');
const fileList = document.getElementById('file-list');
fileInput.addEventListener('change', () => {
fileList.innerHTML = '';
Array.from(fileInput.files).forEach((file, index) => {
const li = document.createElement('li');
li.textContent = file.name;
li.dataset.index = index;
// 이동 버튼 추가
const moveButtons = document.createElement('div');
moveButtons.classList.add('move-buttons');
const upButton = document.createElement('button');
upButton.textContent = '↑';
upButton.addEventListener('click', () => moveItem(li, -1));
const downButton = document.createElement('button');
downButton.textContent = '↓';
downButton.addEventListener('click', () => moveItem(li, 1));
// 삭제 버튼 추가
const deleteButton = document.createElement('button');
deleteButton.textContent = '삭제';
deleteButton.style.background = '#dc3545';
deleteButton.style.marginLeft = '5px';
deleteButton.addEventListener('click', () => li.remove());
moveButtons.appendChild(upButton);
moveButtons.appendChild(downButton);
moveButtons.appendChild(deleteButton);
li.appendChild(moveButtons);
fileList.appendChild(li);
});
});
function moveItem(item, direction) {
const sibling = (direction === -1) ? item.previousElementSibling : item.nextElementSibling;
if (sibling) {
fileList.insertBefore(item, direction === -1 ? sibling : sibling.nextElementSibling);
}
}
document.getElementById('merge-button').addEventListener('click', async () => {
const files = Array.from(fileList.children).map(li => fileInput.files[li.dataset.index]);
const mergedPdf = await PDFLib.PDFDocument.create();
for (let file of files) {
const arrayBuffer = await file.arrayBuffer();
const pdfDoc = await PDFLib.PDFDocument.load(arrayBuffer);
const pages = await mergedPdf.copyPages(pdfDoc, pdfDoc.getPageIndices());
pages.forEach(page => mergedPdf.addPage(page));
}
const pdfBytes = await mergedPdf.save();
const blob = new Blob([pdfBytes], { type: 'application/pdf' });
const url = URL.createObjectURL(blob);
const a = document.createElement('a');
a.href = url;
a.download = 'merged.pdf';
a.click();
URL.revokeObjectURL(url);
});
</script>
</body>
</html>
'[정보] IT정보&활용' 카테고리의 다른 글
| 엑셀로 IPA 분석하기, VBA 활용 (1) | 2024.11.29 |
|---|---|
| PDF 나누기(split) (2) | 2024.11.06 |
| [구글 Apps Script] PDF로 출력하기 (0) | 2024.10.23 |
| [구글 스프레드 시트] 서명받기 (0) | 2024.08.27 |
| 컴퓨터 예약 종료 배치파일(.bat) 만들기 (0) | 2024.06.21 |
설정
트랙백
댓글
글
PDF 파일변환 유틸리티 PDFine v1.2.1
유용한 PDF 변환 무료 프로그램입니다.
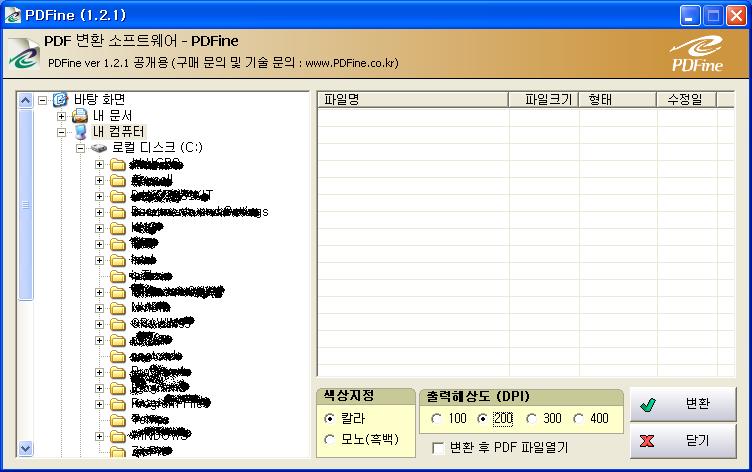
무료에, 워터마크 같은 것도 없고, 사용제한, 회원가입이나 별도의 인증 또한 필요없으니 개인사용자에게는 최고의 프로그램이 아닌가 합니다.
일단 방식은 문서를 이미지로 변환해서 그것을 다시 PDF파일로 읽어들일 수 있게 전환하는 것 같습니다.
사용해 보니 일반적인 PDF 파일과는 다르게 문자에 대한 인식은 안됩니다.
이건 편집을 원하는 분들이라면 단점이 될 수 있겠지만, PDF가 본래 출력전용이라는 목적과 원본파일과 똑같이 전환된다는 측면에서 오히려 전 강점으로 보이네요.
굳이 편집을 원하시면 doPDF 같은 무료 프로그램을 사용하시는 것도 하나의 방법이 될 수 있겠네요.
일단 설명에 따르면 Microsoft Word, Excel, Powerpoint, Internet Explorer, 한컴한글 등의 문서가 변환된다고 합니다.
시험결과 한글2004에서 작성한 파일이 깔끔하게 변환되네요.
해상도는 200 dpi 정도가 적당해 보입니다.
 [PDF변환]PDFine121.exe
###############################
단, 회사는 어떻게 된건지 홈페이지 운영을 안하고 있었습니다. (2008.10.15. 현재)
프로그램 정보에 있는 http://www.pdfine.co.kr와 네이버 검색시 나타나는 http://www.comtelsystem.com 두곳 다 열리지 않았습니다.
###############################
덧붙임)~~
XROSS Media POD 인쇄출판, 여기서 개인사용자에게 무료배포하는 exPDF Workboard라는 프로그램도 괜찮아 보이긴한데..
용량이 30MB로 용량이 너무 크네요.
관심있으신 분들은 아래 링크 참고하세요.
http://pod.xrossmedia.co.kr/ondemand/makeGuide.do?command=makeGuide
'[정보] IT정보&활용' 카테고리의 다른 글
| 구형 PC를 쌩쌩하게 : 유용한 공짜 프로그램 (1) | 2008.11.13 |
|---|---|
| 써멀구리스, 써멀컴파운드, 써멀플로우 (2) | 2008.11.08 |
| 쓸데없는 시작 프로그램을 없애자 (0) | 2008.08.20 |
| HDD low level format (0) | 2008.08.18 |
| 인터넷 익스플로러 자동 닫힘 문제 (8) | 2008.08.06 |


RECENT COMMENT